
In Emplifi Agent, you can schedule any report to be sent to stakeholders on various cadences (daily, weekly, monthly, quarterly, etc.). Reports are emailed to desired recipients and can include stakeholders that do not have access to Emplifi Agent.
Get started by setting up favorite reports
Before you can begin scheduling, you must first set up your reports and save them as either a Shared Favorite or a Personal Favorite.
-
Open Reports and then Reports Admin.
-
Then, create your desired report from the following options:
-
After you create a report, you can save it as a Favorite.
You can save the report as a Shared Favorite or Personal Favorite:
Scheduling a Report
To schedule a report:
-
From the Reports Admin, open Favorites
-
Select My Favorites to schedule a Personal Favorite or Manage Favorites to schedule a Shared Favorite.
In the following example, we will be working with Shared Favorites (Manage Favorites). The process for scheduling a report for Personal Favorites is the same as follows.
This will show a list of all saved reports, and from here, you can begin setting up scheduled reports.
-
First, hover over the report you want to schedule until the hamburger menu appears.
-
Select the calendar with the plus icon.
-
From here, the schedule window will open, and you can begin setting up your scheduled report.
-
Fill in the fields, then click OK.
See the next section Scheduled report settings.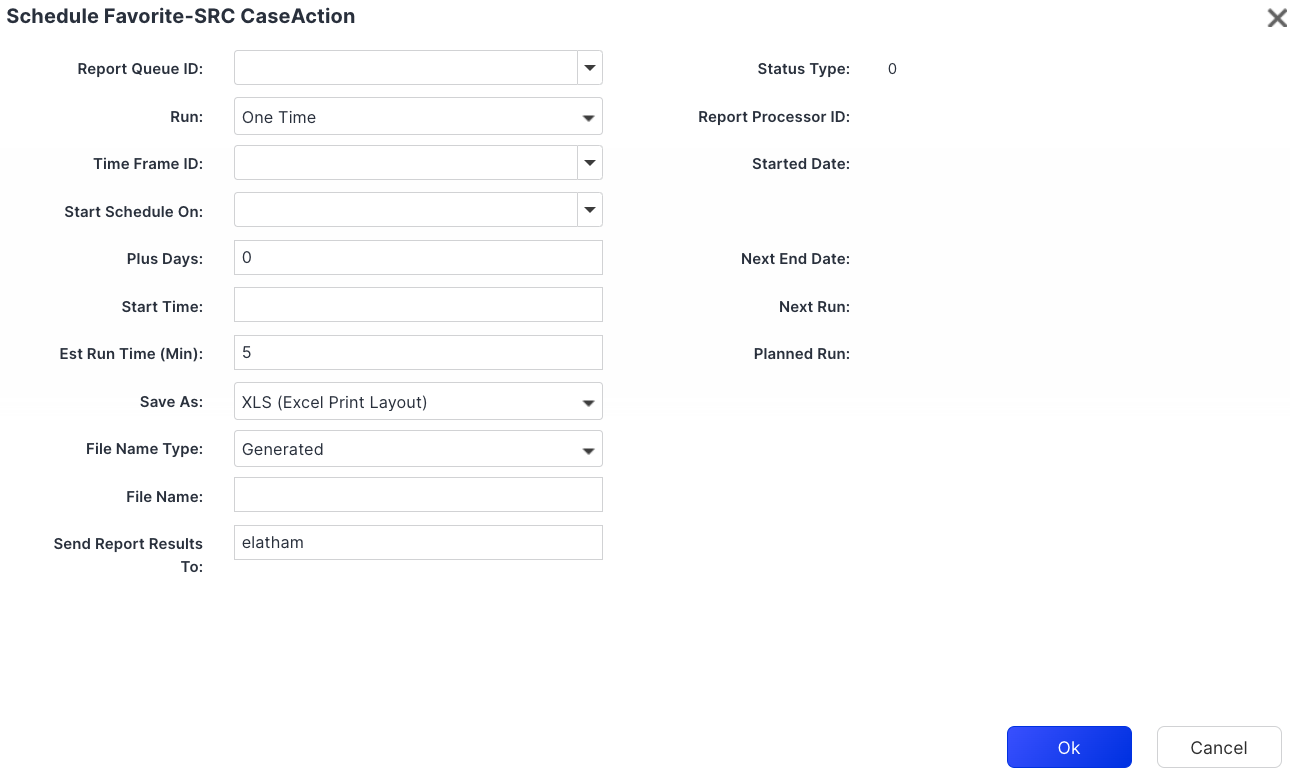
Go to Utilities >Favorites > Background Process Status to confirm that the schedule is in place.
Schedule Report Settings
Report Queue ID
Select the Report Queue ID dropdown and choose from the appropriate queue if there’s more than one. For most, there will only be one to choose from.
Run
Select how often you’d like the report to run, either one time or repeat. If the report is to run on a recurring basis, you’ll select repeat.
Time Frame ID
Using the Time Frame ID dropdown, choose how often the report should run (daily, weekly, monthly, etc.).
If choosing Weekly, review the Plus Days settings carefully.
Start Schedule On
Here you can choose the date for when the report schedule will begin.
If choosing Weekly, review the Plus Days settings, which allow you to alter the start schedule. The Start Schedule On date MUST be the first Sunday date for this to work correctly.
Plus Days (Used for Weekly Schedules ONLY)
If setting up a report to be sent weekly, you can use the Plus Days settings to alter the day of the week the report begins. This works by adding in the number of days past your system start date to alter when the report is sent. For instance, if you do not enter the Plus Days then the weekly report will be sent on the day that matches the start date for your Week defined in Time Frames within Reporting Configuration'
Before altering the start date, you’ll first need to confirm what day of the week your system starts. In order to review this, go to Administration > System Setup > Report Configuration > Time Frames > Week. The Start Day field will indicate what day of the week starts. You’ll need to keep this in consideration before determining how many plus days to use or it will not run on the correct day.
Once your start date is confirmed, enter in the number of days past your start date that you want the report to send on. For example, if your system start date is Sunday and you want the report to be sent on Monday, you’ll need to enter “1” for this to occur (Sunday +1 Day = Monday).
If you’d like to send multiple weekly reports, you’ll need to repeat the process of setting up a schedule and entering the appropriate Plus Days for each day.
Start Time
Enter the time the report should run using military time (14:30:00 for 2:30 pm).
Est Run Time (Min)
This is a system setting and can be ignored. Do not enter information in this box.
Save As
Select the type of report format that needs to be generated. Use XLSX format only for Excel (the the XLS format is for backwards compatibility).
File Name Type
Choose how the file will be named:
-
Full File Name: provides what is entered in the File Name field (see the following setting below)
-
Partial + Day in Yr: provides the file name plus the Julian Date
-
Generated: provides a letter and number for the file name
File Name
Enter the name that you want to use for the file if the Full File Name or Partial + Day in Yr options are chosen.
As a best practice, match the file name to the Favorite so it can easily be identified if needed for an update.
Send Reports To
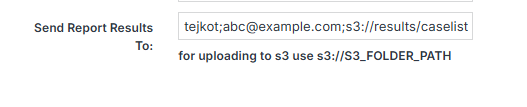
Enter the user IDs of agents (if their email addresses are included) or the email addresses of individuals who should receive the report.
To upload report results directly to S3, provide the S3 path, which should begin with s3://<YOURFOLDERPATH>.
-
The path is case sensitive.
-
Your S3 path must be an S3 Emplifi location set up for you by Emplifi Support. If you do not have an S3 Emplifi location, contact Suppor to request it.
-
Only the specified bucket in the system can be used; any other S3 buckets are not permitted.
-
If you are uploading files for multiple users, separate each email address and S3 bucket path with a semicolon.
Examples of Scheduled Reports
Below are examples of setting up scheduled reports to walk through the process using real scenarios:
Weekly Report That Runs on Tuesdays
-
Since this report is set for Tuesday, we’ve entered ‘2’ in the Plus Days fields.
-
Our system’s start day is Sunday, so by entering Plus 2, the system sends the report on Tuesday
-
Daily Report That Runs at 7 am
Monthly Report That Runs on the First of the Month