Fulfillment and Server-Side Printing
Setting Up Fulfillment Printers for Server-Side Printing
Fulfillment Printers are set up in the Configuration Editor.
From the Application Function Bar, select Administration > Configuration Settings.
Select the configuration for which you want to set up printers.
Click the Fulfillment option.
The Fulfillment HTML Printer Settings section allows you to define a set of separate printers to use for each letter type–known as server-side printing. If you do not define printers in this section, your system will use client-side printing, utilizing the browser.
Each letter type that will use server-side printing must be defined within your configuration. If you have a mix of letters, checks, and coupons that will print some via server-side printing and some via client-side, then you need to set up letter types that correspond to either server-side printing or client-side. You will then need to make sure the appropriate standard letter default letter type corresponds to the correct letter type for printing purposes. If you want to use server-side printing for checks and coupons, then complete the following steps. If you will use client-side printing for checks/coupons, then make sure the letter type for the check’s/coupon’s standard letter is not defined in the fulfillment configuration. Checks and coupons can behave differently when printed. For example, if you want checks to be printed server-side and coupons client-side, just define the appropriate letter types and printers (if needed).
Printing Checks/Coupons and Server-Side Printing
To set up a Fulfillment printer for Checks:
Add a letter type for checks/coupons. For information about letter types, see Defining Letter Type Codes.
Assign the Checks letter type to the standard letter defined for the check/coupon. For information, see Processing Checks and Coupons.
In Configuration Maintenance, follow the steps in the Fulfillment HTML Printers section on page Configuration: Fulfillment to add the Checks Letter Type and define Printers.
If you set up server-side printing, when you run the Process Batch Utility and click the Print button next to the check/coupon, the check/coupon is submitted to the defined printer without a print preview. To preview a check/coupon, first click the URL of the document to access a preview of the document. The check/coupon number displays as VOID.
The check and coupon documents that are stored on the server under the Fulfillment folders now contain the word "VOID" in place of the document number in the file name. However, when actual document numbers are assigned, and client-side printing is in effect, a temporary document is created and downloaded to the client, and left in the folder with the same name except an "N" before the .htm.
If you do not add the Checks letter type to the Fulfillment Configuration, the Checks letter type uses client-side printing utilizing the browser.
Select Server-Side Printers
From several locations in Emplifi Agent you can access the Select Printer button, which allows you to select from the server-side printers defined in the Fulfillment Configuration. Multiple server-side printers can be set up for each Letter Type.
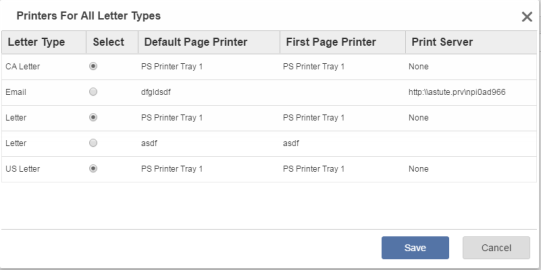
Click the Select Printer button. The Select Server Side Printer dialog displays.

In the Select column, click the radio button next to the Server Side Printer that you want to use when printing the Letter Type. When multiple printer configurations are set up for the same Letter Type, the Default Page Printer must be unique for each fulfillment printer that you define. If the Default Page Printer is set to the same printer, the Select radio button on the Select Server Side Printer dialog is selected for each printer that matches the Letter Type and the Default Page Printer and cannot be changed.
The Select Server Side Printer dialog can be accessed from the Print Documents view of the Process Batch utility. When accessed from this view, the dialog displays all of the server-side printers set up for all letter types included in the batch and allows you to select those that you want to be used when printing within fulfillment.
If printing from the case or Mass mailing only the letter type of the selected letter will display.
The settings apply across all Emplifi Agent windows on the client machine and are retained between Emplifi Agent sessions. The exception is Mass Mailing which retains the selected printer with the Mass Mailing definition.
If the current selected printer is not found in the configuration the default for the letter type will be used.
