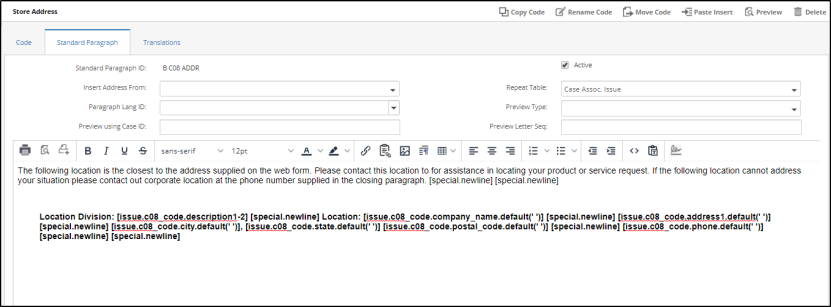
Creating a Paragraph Using the Editor
If you are creating a paragraph that will be used on an HTML-based letter or editing an HTML letter on a case, you can use the Editor toolbar to include special formatting (such as font colors, size, bold, and italic).
You need to set the Preview Type field to "HTML text" for the paragraph to preview correctly.

The following formatting buttons are available on the toolbar. When you are finished, click Save on the banner to save the changes made to the paragraph.
Button | Description | HTML |
|---|---|---|
 | Prints the paragraph as text showing the special inserts. |
|
 | Displays a print preview of the paragraph in a new window.
|
|
 | Allows you to select a printer to print the paragraph as text. |
|
 | Applies bold to the selected text. | <STRONG> ... </STRONG> |
 | Applies italics to the selected text. | <EM>... </EM> |
 | Underlines the selected text. | <U>... </U> |
 | Applies strikethrough to the selected text. | <S>...</S> |
 | Displays the Font Family menu where you can select the type of font for the selected text. | <FONT face="Arial"> |
 | Displays the Font Sizes menu where you can select the size of the font for the selected text.
| <FONT size="3"> |
 | Displays the Text Color menu where you can select the color of the selected text. | <FONT color="blue"> |
 | Displays the Color dialog where you can select a highlight color for the selected text. | <FONT style="BACKGROUND-COLOR: #ffff80">... </FONT> |
 | Displays an Insert Link dialog where you can enter the URL, the text to display in the message, a title, and select a target. | <a href="https://www.emplifio.io/"> |
 | Displays the Insert/Edit Image dialog which allows you to insert an image into your paragraph. You can set the source, give the image a description, and enter the dimensions for the image.
| <IMG alt="" hspace=0 src="image.jpg" align=baseline border=0> |
 | Inserts a blank line for you to type your next paragraph of text. | <P> </P> |
 | Justifies the selected text to the left of the page. | <P align=left>...</P> |
 | Justifies the selected text in the center of the page. | <P align=center>...</P> |
 | Justifies the selected text to the right of the page. | <P align=left>...</P> |
 | Inserts a number list where the cursor is in the text. When you view the HTML for a numbered list, there will be a pair of <LI></LI> tags for each numbered item in the list. | <OL> |
 | Inserts a bulleted List where the cursor is in the text. When you view the HTML for a bulleted list, there will be a pair of <LI></LI> tags for each bulleted item in the list. | <UL> |
 | Decreases the indentation of the paragraph after applying the right indent. | <P dir=ltr style="MARGIN-RIGHT: 0px">...</P> |
 | Increases the indentation of the paragraph to the right. | <BLOCKQUOTE dir=ltr style="MARGIN-RIGHT: 0px"> <P>...</P> </BLOCKQUOTE> |
 | Displays the Source code dialog where you can view and edit the HTML code. |
|
 | When text is copied from the web or a Word file, click the Paste as Plain Text button to paste the text into the letter/paragraph after removing all HTML formatting from the text. |
|
 | Adds the script signature to the letter. The signature name must be entered on the User Options screen in the Letter Signature field or on the System User Codes screen in the User Preferences section. |
|
