Email Service - Graph Integration Settings
For PCEmail to access Microsoft Office 365 messages, an administrator must set up the restricted access permissions within Office 365. This set up must be completed before the Graph integration is set up in Emplifi Agent.
The steps for limiting access to a specific account will vary based on your company's configuration. Basic instructions for limiting access are included in this topic.
An Office 365 administrator must set up the restricted access permissions by completing the following:
Register the Application
Set up the Client Secret
Set up the API Permissions
Restrict Permissions to Mailboxes that operate with the PCEmail service.
Registering the Application
During the registration process, the generated Application ID, Tenant ID, and Client Secret values will be displayed. You need to capture these values to enter them on the Emplifi Agent External Mailbox Connection settings. For more information, see Email Service - Mailbox Settings.
To register the application:
Sign into the Microsoft 365 Admin Center.
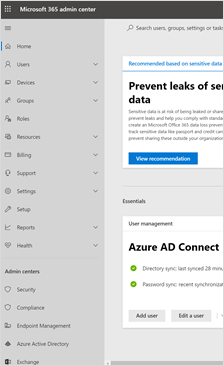
On the navigation panel, select the Azure Active Directory option.
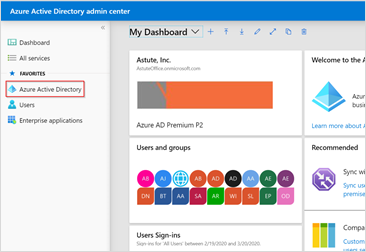
Under the Manage section of menu panel, select App registrations.
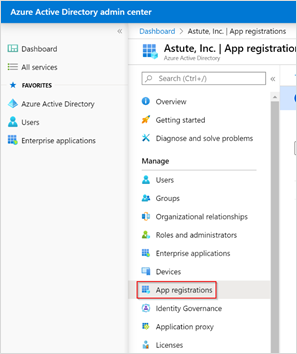
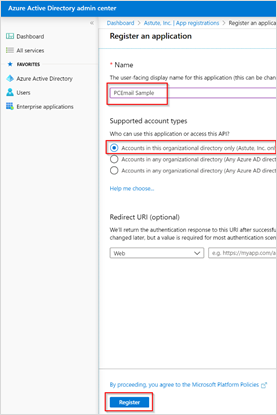
Select New Registrations and the following Register an application screen will display.
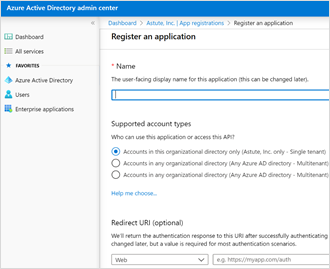
In the Name text box, enter "PCEmail" as the display name.
Under Supported account types, choose Accounts in this organizational directory only.
Then, click Register.
Setting up the Client Secret
To set up the Client Secret:
Under the Manage section of menu panel, click Certificates and Secrets.
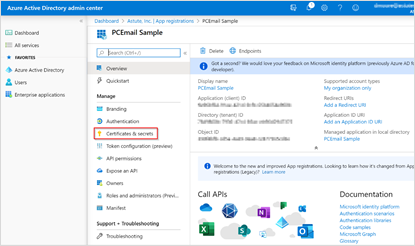
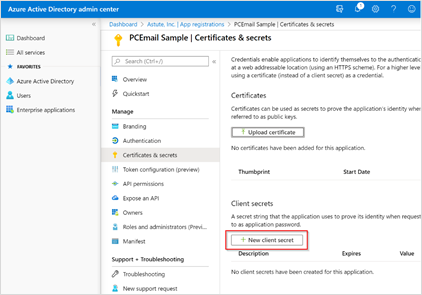
On the Certificates and Secrets screen, click the New Client Secret button.
On the Add a Client Secret window, in the Description text box enter a name for the secret. Choose when the secret expires. You may choose up to 2 years.
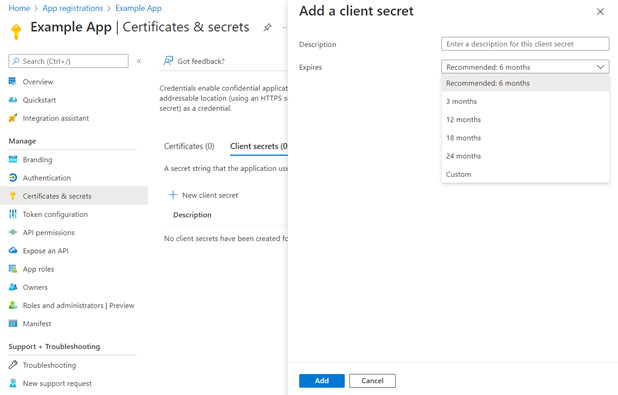
Then, click the Add button.
Setting up the API Permissions
An administrator will need to set up the inbound email permissions and outbound email permissions for the API.
Inbound Email Permissions
To set up inbound email permissions:
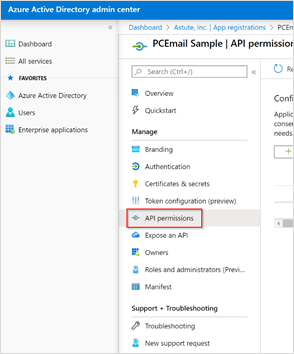
On the Manage section of the menu panel, select API Permissions.
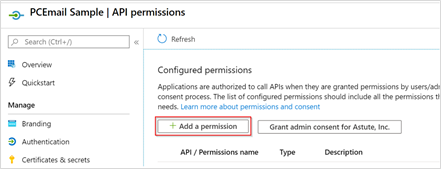
Click the Add a permission button.
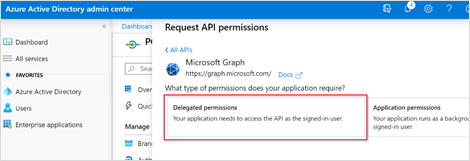
On the Request API permissions window, click Microsoft Graph.

Then, click Delegated permissions.
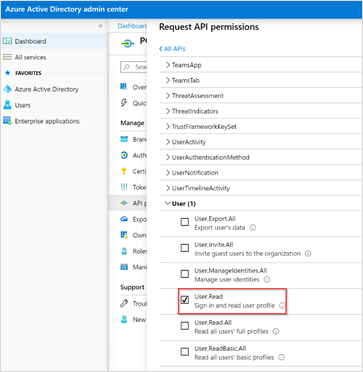
Under All APIs, select User (1). Then, select the User.Read check box.
Repeat steps 2 and 3. Then, click Application permissions.
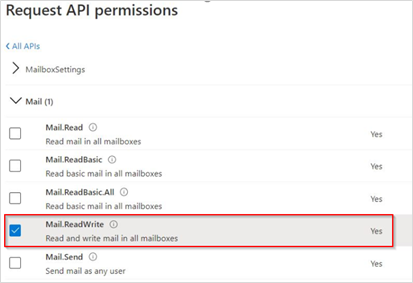
Select Mail (1). Then, select the Mail.ReadWrite check box.
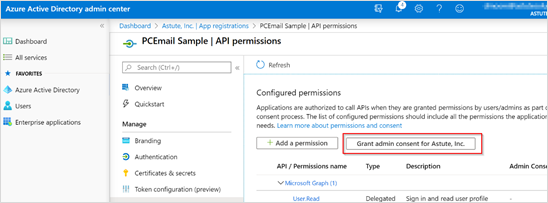
On the Configured permissions view, select User.Read and click Grant Admin Consent for Emplifi Inc.
On the Configured permissions view, select Mail.ReadWrite and click Grant Admin Consent for Emplifi Inc.
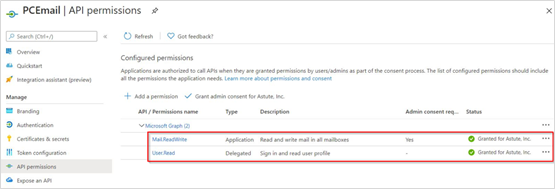
To verify the permissions were added, under Microsoft Graph, you should see both Mail.ReadWrite and User.Read with a status of "Granted".
Outbound Email Permissions
To set up the outbound email permissions:
Follow steps 1-3 in the "Inbound Email Permissions" section.
On the Request API Permissions window with Microsoft Graph selected, click Application Permissions.
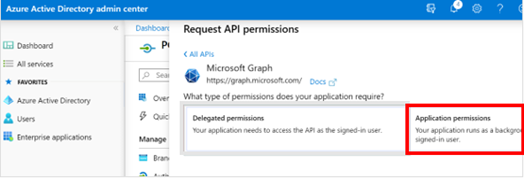
Select Mail. Then, select the Mail.Send checkbox.
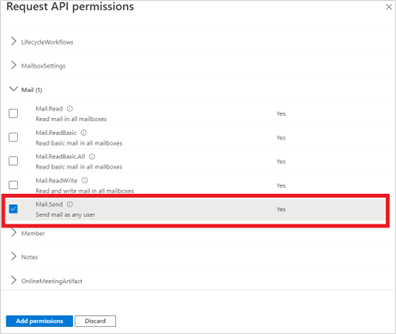
Click Add permissions.
On the Configured permissions view, select Mail.Send and click Grand Admin Consent for Emplifi Inc.
To verify the permissions were added, under Microsoft Graph, the Mail.Send permission should show a status of "Granted".

Restricting Permissions to Mailboxes
The permissions granted apply to all Microsoft Office 365 mailboxes. You need to restrict permissions to just those mailboxes that the PCEmail service should operate against. This is done through Exchange Online PowerShell. The steps for restricting permissions are described below. For more information, see the Microsoft document titled, https://docs.microsoft.com/en-us/graph/auth-limit-mailbox-access.
To restrict permissions to mailboxes:
Connect to Exchange Online PowerShell.
Identify the application's client ID and a mail-enabled security group to restrict the application's access to. The mail-enabled security group must be created before running the PowerShell command to restrict permissions, and the account of the target mailbox needs to be in that group.
Create an application access policy. Run the following command replacing the AppId, PolicyScopeGroupId, and Description arguments.
New-ApplicationAccessPolicy -AppId e7e4dbfc-046f-4074-9b3b-2ae8f144f59b -PolicyScopeGroupId EvenUsers@contoso.com -AccessRight RestrictAccess -Description "Restrict this app to members of distribution group EvenUsers."
Test the new application access policy. The policy can be tested by running the following command, replacing the AppId and Identity arguments.
Test-ApplicationAccessPolicy -Identity user1@contoso.com -AppId e7e4dbfc-046-4074-9b3b-2ae8f144f59b
