Creating Special Report Columns
Special Report Columns allow you view the data you already have in a different way. By defining your own Special Report Columns, you can manipulate the data that is already captured into different formats. For example, by using "Date Added" and "Date Closed", you can manipulate the data to show the "Number of Days to Close." You can merge/combine fields, format fields, or pull information out of certain fields. Once the Special Report Column is created, you can use it in any filter and in most reports or utilities.
If you are not experienced with database functions, your Database Administrator or an Emplifi Consultant can create the syntax for you.
The table below illustrates some examples of Special Report Columns.
Description | Database | Description2 Entry | Example of Result |
|---|---|---|---|
Date in MM/DD/YYYY format | SQL Server | {CONVERT(varchar, issue.date_added, 101)};issue | 10/27/2017 |
Year of Issue | SQL Server | {DATEPART(yyyy,issue.date_added)};issue | 2018 |
Hour of Issue | SQL Server | {DATEPART(hh,issue.date_added)};issue | 15 |
Full Case ID | SQL Server | {cast(issue.case_idaschar) +"."+cast(issue.issue_seqaschar)};issue | 23001.2 |
Combine two categories | SQL Server | {issue.c08_code+"."+issue.c10_code};issue | 5.11 |
To create a Special Report Column:
From the Application Bar, select Administration System Setup System Metadata System Paragraph Inserts Special Report Columns.
Click New Code. An Override Security message will display.
 Editing system categories can affect the performance and usability of Emplifi Agent. You should ONLY use the following password to add Special Report Columns.
In the Password field, enter pwrctr. The New Category Code dialog will display.
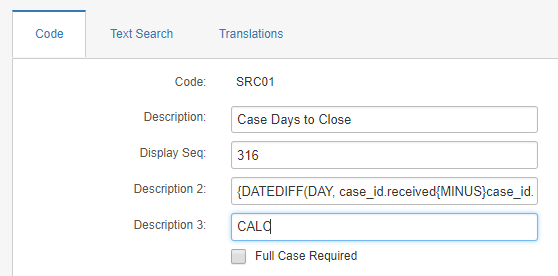
In the ID field, enter SRCxx. For xx, enter a number to make the code unique. The new code will display on the Code tab.
Enter a Description for the code. The description will display in report columns and filters.
In Description 2, enter the SQL syntax to produce the required results. (The table above shows several common examples.)
In Description 3, enter CALC.

Click Save. The code is immediately available to use in most reports and utilities.
Using a Special Report Column
Now that you have created a Special Report Column, you can use it on most reports and utilities. Below are the steps for using the Special Report Column. For our example, the Frequency Report is used.
To use a Special Report Column in the Frequency Report:
From the Application Bar, select Reports > Case Reports > Frequency Report.
In the Generate Columns section, select the "Hour of Issue" from the Column Category list.
In the Generate Rows section, select the "Origin" from the Row Category list.
Click the New Filter button.
Add the filter: Issue Date Added Between Month p-1 through p-1.
Click Run to generate the report.

