Editing a Layout
This topic discusses manipulating fields on a layout. For information on opening, saving, deleting, and generating layouts, see the other topics in the layout editor section.
If an agent has administrator privileges, the Layout Editor option displays on the Administration page. The Layout Editor allows a user to select and arrange the data entry fields for screen layouts.
Using the drag-and-drop operation, you can add fields to a screen within columns. A dotted line at the top of the Layout Editor displays where the columns are located on the page. It is recommended that 2 columns are used for the best layout. However, you may add up to 4 columns of fields. If you are using more than 2 columns, we recommend using smaller field labels to improve the layout.
Once the layout is created, you may preview the screen to view the top-level layout.
If you edit the order of sections on the case page, you may also need to customize the Case Side Bar. Contact your Emplifi representative for more information.
Adding Fields
To add a field to a layout:
On the Fields tab, navigate to the field that you want to add to the layout.
Begin typing in the Filter Categories search box to narrow down the list.
Click the field, and while holding the mouse down, drag the field into the layout column where you want it to be placed. Then, release the mouse button.
The new field is added to the layout. If you placed it on top of another field, the other fields in the layout are re-ordered appropriately to make room for the new field.
Adding Sub-Layouts
Sub-layouts allows you to create miniature layouts within a layout - or multiple sections to be arranged on a single view. This is useful if you want several layouts to have the same elements in the same place. You can create just that section as a sub-layout and add the whole section to each layout at once, instead of adding each element individually.
To create a sub-layout:
Click the Sub-layouts tab on the right side of the window.
Click the sub-layout, and while holding the mouse down, drag the sub-layout into the layout column where you want it to be placed. Then, release the mouse.
The sub-layout will appear in the column as a link. Clicking this link will take you to the layout editor for that layout.
When editing a sub-layout, a breadcrumb trail displays at the top of the layout editor. Clicking a layout name in the breadcrumb trail takes you back to the layout editor for that layout.
The following example describes the process if you wanted CaseEditIssueDetail to include CaseEditIssueEssential.
Open CaseEditIssueDetail in the layout editor:

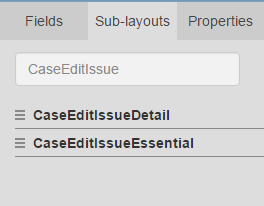
On the side panel, click on Sub-layouts and find CaseEditIssueEssential:

Drag and drop CaseEditIssueEssential into the current layout:

Save and generate the layout.
Clear browser cache.
Log out and log back in.
Create a new case and look at the Issue section:
Essential view
Detail View

Occasionally, adding sub-layouts will automatically shift fields around. In the Detail view above, Date Added was automatically moved to the left column, even though it is in the right column in the layout editor.
To fix this:
Open the CaseEditIssueDetails in Layout editor.
Add a Blank above date_added:

Go back to the case. Date Added will display in the right column:

Editing Field Properties
To edit the properties of a field on a layout:
Select the field whose properties you want to edit.
Click the Properties tab on the right side of the window. The properties display for the selected field.
Edit the property values as desired.
For more information, see Field Properties.
Moving Fields
To move a field to a different spot on a layout:
Click on the field that you want to move, and while holding the mouse down, drag the item to the new location where you want it to be placed, then release the mouse button.
The field will be moved to the new location, and the other fields will be repositioned appropriately.
Removing Fields
To remove a field from a layout:
Click and hold the field in the layout, while dragging the field into the Fields tab.
The field is removed from the layout and the other fields are repositioned appropriately.
Adding or Removing Columns
To control the number of columns:
Click Add Column to display an additional column. The column is added on the right side of an existing column. A dotted line partially displays the column, so that you can view where the column is located on the screen.
Click Remove Column to delete the last column (far right side).
Changing the Order of Sections
For the CaseEditCaseFullH and AddressEditAddressFullH layouts, you can change the order in which the sections will display.
To move a section on the layout:
Open the layout you want to edit.
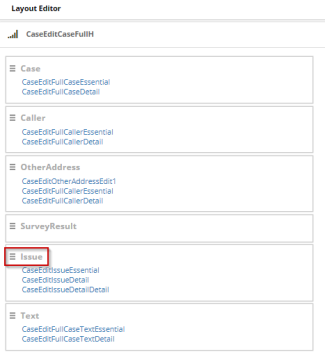
Click and hold the section name you want to relocate. In the example below, the Issue section is located below the SurveyResult section. This section will be selected and relocated on the layout.

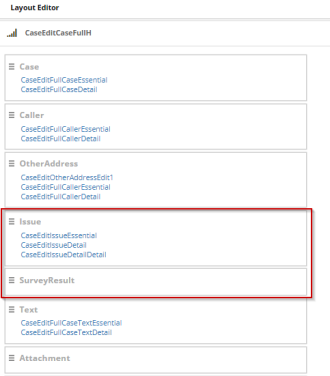
Use the drag and drop operation to move the section. In the example below, Issue was moved to display before the SurveyResult section on the layout.

